При выполнении отделочных работ в доме или квартире часто используются специальные смеси, которые изготовляются на связывающей основе. С их помощью можно выравнивать как стены в комнате, так и потолки. На одних упаковках стоит название «шпатлевка», а на других — «шпаклевка». Есть ли между ними разница, и если есть, то в чем она состоит?
Шпатлевка и шпаклевка: общее описание
Шпатлевка представляет собой порошкообразную или же пастообразную смесь. В ней находятся такие компоненты: просеянный гипс, чистый мел, а также столярный клей. Сюда же добавляются и разные минеральные наполнители. Такая смесь нужна для того, чтобы выполнить финишную отделку поверхности перед тем, как она будет окрашиваться или покрываться обоями.
В зависимости от состава, эта отделочная смесь бывает таких видов:
Клеевая.
Латексная.
С акриловой основой.
Масляная.
Но встречается также масляно-клеевая. Есть смеси, которые предназначены только для внутренних работ. Но имеются и такие, которые разрешается использовать для отделки наружных стен. Что касается шпаклевки, она также предназначается для того, чтобы с ее помощью можно было выравнивать поверхности.
Шпатлевка и шпаклевка: в чем же разница?
Иногда покупатели видят в строительных магазинах разные названия как будто одной и той же выравнивающей смеси. Но на одной они читают «Шпатлевка», а на другой стоит совсем другое название, которое заключается в разнице одной буквы — «Шпаклевка». Некоторые не могут разобраться, в чем же заключается разница. А она есть, но только в орфографических названиях. С чем это связано?
Все дело в том, что «шпатлевка» произошло от такого немецкого слова как Spatel. Это имеется ввиду специальная лопатка, с помощью которой смесь наносится на поверхность, а потом выравнивается. В русском произношении больше прижилось слово «шпаклевать», поэтому и стали называть смесь «шпаклевкой». Но в любом случае надо знать, что первый вариант — это профессиональное название, а второй — разговорное или общеупотребительное.
Почему же некоторые производители отделочных материалов пишут «шпатлевка», а другие — «шпаклевка»? Некоторые специалисты говорят, что это от неграмотности. Но правильным будет такой ответ: как богат русский язык! Ведь только в нем один и тот же товар может иметь несколько официальных названий. К сожалению, это часто приводит к путанице и недопониманию.
Применение шпатлевки
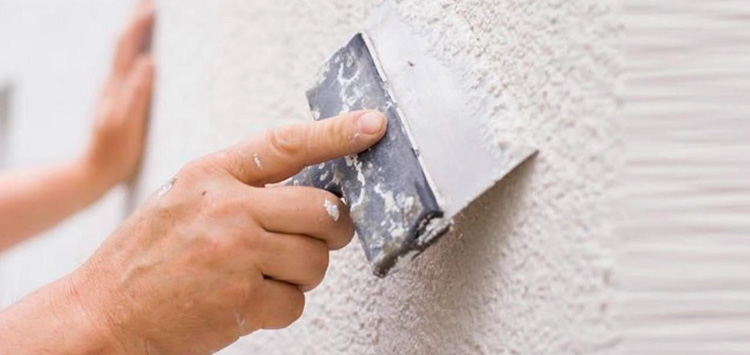
Шпатлевка представляет собой пастообразную консистенцию. Наносить ее можно на разную поверхность в виде кирпича, бетона или штукатурки. Перед использованием данной смеси поверхность следует хорошо очистить. Применяется такой отделочный материал, если на поверхности, которая должна краситься, имеются трещины или выбоины. Если наблюдаются серьезные неровности, необходимо использовать штукатурку. А при незначительных дефектах более рационально применять шпатлевку.
Когда вы сомневаетесь, что же можно использовать, шпатлевку или шпаклевку, лучше брать то, что дешевле. Стоимость зависит не от состава (он у каждого вида совершенно одинаковый), а от производителя. Естественно, что более раскрученный бренд стоит дороже. Но если есть подозрение, что товар некачественный или просроченный, надо брать то, что дороже. В этом случае точно не прогадаете.
Даже если поверхность, которая нуждается в такой отделке, потом будет белиться, можно без сомнений использовать шпатлевку или шпаклевку. Этот отделочный материал отличается высокой белизной. В его составе отсутствует олифа, поэтому стену или потолок разрешается покрывать белилами. Слой шпатлевки надо наносить не толще 1 мм. Для более качественного высыхания температура воздуха не должна быть ниже +20 градусов.
Следующий слой можно наносить не раньше, чем через 30 минут. Но если температура воздуха в помещении составляет +15 градусов, время высыхания шпатлевки будет значительно дольше — до 4 часов. Чтобы приступить к покраске поверхности или использованию обоев, должно пройти по крайней мере 24 часа. Перед покупкой этой выравнивающей смеси следует просчитать, сколько же ее потребуется. Исходить надо из расчета 300-600 г на 1 метр квадратный. Все зависит от того, сколько слоев придется наносить и насколько большие неровности на поверхности.
Выводы
Разобравшись с этой отделочной смесью, можно сделать такой вывод:
Слово «шпатлевка» возникло от существительного «Шпатель». А вот «шпаклевка» появилась благодаря глаголу «шпаклевать».
Как устная словоформа этих названий, также письменная являются правильными.
Практически все профессиональные строители чаще употребляют слово «шпатлевка», а любители — «шпаклевка».
Так что можно смело покупать такую выравнивающую смесь как под одним, так и под другим названием.
Шпаклевка или шпатлевка — как правильно?
Шпаклевка – неудобное и коварное слово, ведь каждый раз приходится сомневаться: а все ли правильно? «Шпатлевка» или «шпаклевка» – это только начало, а как назвать сам процесс? Вопросов не вызывает основной рабочий инструмент – шпатель, но правильно ли отталкиваться от него? Мы готовы раз и навсегда прояснить эту ситуацию, а заодно разобраться, что это за техника и где она используется.
Шпаклевать или шпатлевать?
Для начала нашего исследования возьмем именно «шпатель» либо немецкий «spatel», который пришел с латыни от слова «spathula» – «ложка». Простой и практичный инструмент используют не только для строительно-отделочных работ: разные модификации нужны врачам, фармацевтам и живописцам.
Словарь Даля фиксирует сразу три формы: «шпаклевка», «шпатлевка» и «шпадлевка». Тонкость обусловлена спецификой калькирования и заимствования слов из одного языка в другой. Именно такие формы в русском приобрело понятие «spachteln», хотя «шпадлевка» в итоге почти не прижилась.
Некоторое время считалось, что «шпатлевка» – это профессиональное определение, а «шпаклевка» – универсальное. Но в 40-х годах унифицировали именно вторую форму, а лингвисты связали ее с уже существовавшим понятием «пакля» по фонетической аналогии.
На практике сегодня оба понятия существуют вполне равнозначно, так что назвать одно из них неправильным – в корне неверно. Даже деление на профессиональный и непрофессиональный сленг не прижилось надолго, потому что ремонтом и отделкой занимаются слишком много людей. Так что можешь говорить «шпаклевка» или «шпатлевка», тем более что это никак не влияет на качество работ.
Виды и составы
Разные виды шпаклевки отличаются составом, а классифицируют их с учетом основного компонента. Именно он определяет сферу применения и особенности нанесения того либо иного материала.
Гипсовая шпаклевка
Белоснежная пластичная гипсовая шпаклевка удобна в работе: она легко наносится и шлифуется. Это хороший экологичный материал для создания комфортного микроклимата и здоровой влажности в помещении. Особенность напрямую связана со свойством гипса вбирать из воздуха лишнюю влагу и отдавать ее при нехватке.
Гипсовая шпаклевка используется только в помещении, потому что на улице она быстро разрушается. Это базовые и финишные смеси для разравнивания незначительных перепадов до 5 мм. Именно этот состав используется при монтаже гипсокартонных конструкций для заделки стыков и устранения мелких дефектов.
Цементная шпаклевка
В отличие от гипса, цементная шпаклевка подходит для помещений и для наружных работ. Она не так чувствительна ко влаге, температурным перепадам или другим внешним воздействиям. Используют цемент для бетонных или кирпичных оснований, во время фасадной отделки и во влажных помещениях.
Но за счет высокой прочности цементную шпаклевку сложнее обрабатывать и шлифовать. Для нее недостаточно привычных абразивных материалов, поэтому она используется в качестве стартового чернового слоя. Зато облицовка или фактурная декоративная штукатурка поверх держится намного лучше.
Полимерная шпаклевка
Во время финишных отделочных работ в помещении используются деликатные полимерные шпаклевки. При благоприятных условиях они способны заменить собой герметик для заделки швов и стыков. Подходит она и для разравнивания мелких трещин и дефектов, которые появляются из-за влажности.
Акриловая шпаклевка
По тому же принципу, что и полимеры, применяется акриловая шпаклевка для подготовки основания к покраске. Это практически ювелирный материал, который наносится слоем около 1 мм и создает идеально гладкое глянцевое покрытие.
Акриловая шпаклевка бывает универсальной или фасадной, с плотной мелкозернистой поверхностью. Она прочная, устойчива к истиранию, не боится влаги, быстро высыхает и сочетается со всеми строительными материалами. Это одна из самых экологичных, безопасных и высококачественных смесей.
Клей, масло и латекс
Клеевая смесь состоит из самого раствора клея, олифы и мела, поэтому она прочная и долговечная. Масляно-клеевая шпаклевка содержит акрилаты, пластификаторы и другие примеси. Она подходит для сокрытия дефектов бетонных и деревянных конструкций в помещении. По тому же принципу используется латексная смесь.
Масляная шпаклевка основана на олифе с добавлением мела и добавок для ускорения застывания. Она нужна для монтажа подоконников, пола, окон и дверных коробок перед нанесением масляных или водно-дисперсионных красок с эмалями.
Шпаклевка и штукатурка: в чем разница?
Если шпаклевка и шпатлевка – одна смесь с разными исторически сложившимися названиями, то штукатурка – уже совершенно другой материал. Состоит она из цемента, песка, полимерных добавок, стабилизаторов и пластификаторов. В качестве наполнителя вводится даже крупный щебень, поэтому отличить зернистость массы можно даже визуально.
Штукатурка используется для выравнивания кривых стен, устранения завалов, больших трещин, выбоин и других крупных дефектов. Шпаклевка нужна для деликатных работ, вроде замазывания швов или царапин. Она не годится для устранения крупных перепадов и наносится тоньше.
Толщина штукатурки – до 10 мм, но она может наноситься в несколько слоев общей толщиной до 50 мм. Свыше 30 мм используется армирование стальной или стеклосеткой, чтобы придать покрытию дополнительную прочность.
Штукатурка наносится непосредственно на прогрунтованное основание, а вот шпаклевку можешь наносить уже на штукатурку для окончательных косметических работ. Это нужно, если ты планируешь оклеить стены тонкими обоями или просто покрасить краской.
Как подготовить шпаклевку к использованию?
Большинство составов для шпаклевания продаются в виде сухой смеси банками, ведрами и целыми мешками. Сразу к применению готова только акриловая и еще несколько специализированных линеек шпаклевок. Остальные же нужно сначала замешать и подготовить перед нанесением на основание.
Замешивай массу во вместительном ведре в пропорции, указанной на этикетке конкретной марки. Используй только холодную воду, потому что высокая температура ускоряет застывание. Высыпай сухую массу в жидкость, а не наоборот, а количество регулируй с учетом нужной консистенции.
Для финишной отделки нужна жидкая шпаклевка, которая наносится тончайшим слоем. Для черновых работ и выравнивания подойдет более плотная смесь. Чтобы масса была однородной, лучше замешивать ее с помощью инструментов: строительного миксера или насадки на перфоратор.
Чтобы порошок размок и смесь окончательно приобрела свои пластичные свойства, оставь ее постоять 5-7 минут. А после этого снова перемешай миксером, чтобы разбить даже незначительные уплотнения. Такую процедуру можешь повторить несколько раз – и работать со шпаклевкой будет гораздо удобнее.
Шпаклевание стен
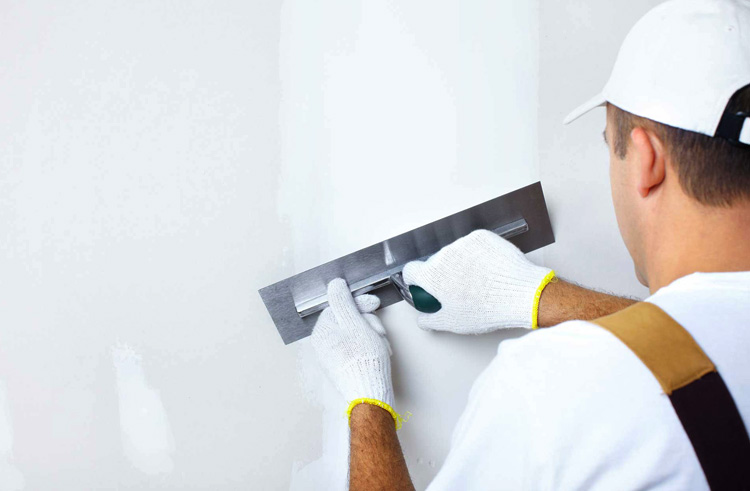
Для нанесения шпаклевки тебе понадобится минимальный набор инструментов: миксер для замешивания, кисти и валики для грунтовки, уровень для контроля и наждачная бумага для шлифовки. А главное – набор шпателей разного размера: от миниатюрных до 40-50 см. С их помощью легко обрабатывать и большие широкие плоскости, и углы с примыканиями либо труднодоступные места.
Готовые составы не нужно замешивать, так что с ними проще и быстрее работать. Но обычно они дороже, меньше хранятся после открытия и дают более заметную усадку.
Обязательно очисти основание от пыли, жира, краски, копоти и любых других пятен – все это ухудшает сцепление. Адгезионные свойства шпаклевки не слишком высоки, поэтому не забывай про грунтовку. Категорически не рекомендуется наносить строительную смесь на промерзшие основания: она не схватится как нужно.
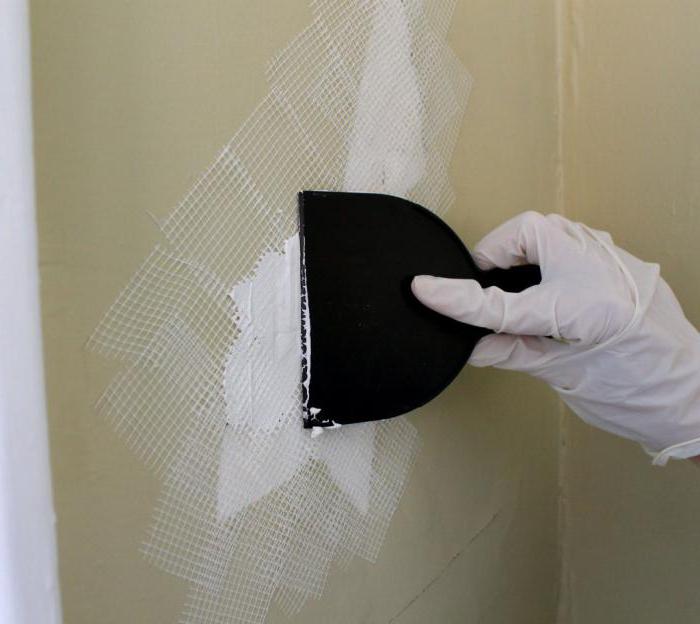
Для выравнивания поверхности используй малярную сетку: так шпаклевка лучше распределяется и прочнее держится. Финишные составы уберут мельчайшие поры и полосы от шпателя, но обязательно наноси их только поверх выравнивающей смеси. При выборе учитывай, что типы и составы обоих материалов должны сочетаться между собой.
Для нанесения массы используй широкий шпатель под углом примерно в 30 градусов. Распределяй состав постепенно средними порциями, и наноси каждый новый слой внахлест, чтобы сгладить переходы. Для удобства лучше замешивать шпаклевку маленькими порциями во время работы, иначе она быстро застывает.
Для углов используй специальные угловые шпатели – так тебе удастся добиться идеально ровного стыка. Просуши покрытие в течение суток, чтобы оно полностью застыло перед новым слоем. Шлифовка, покраска или оклеивание обоями – только после полного высыхания всей поверхности.
Шпатлевка или шпаклевка? В чем разница между шпаклевкой и шпатлевкой?
Отделочные работы осуществляются в несколько этапов, в качестве первого из которых выступает выравнивание потолков и стен. Для этой цели применяют специальные минеральные составы, изготовленные на связующей основе. Они известны среди потребителей под названием шпатлевки. Приобретая подобные смеси, вы можете заметить название, указанное на упаковке, – шпаклевка. Для того чтобы не мучиться в догадках, шпатлевка или шпаклевка нужна для проведения работ, необходимо разобраться со значением упомянутых слов. Попробуем сделать это в данной статье.
Описание шпаклевки и шпатлевки
Если вы задумались над вопросом о том, чем отличается шпаклевка от шпатлевки, то необходимо определить, что данные смеси представлены пастообразным или порошкообразным составом, среди ингредиентов которого содержится столярный клей, просеянный гипс, мел, а также всевозможные минеральные наполнители, которые применяются в качестве ремонтного материала для выравнивания оснований перед окрашиванием или проведением других отделочных работ. Шпатлевка или шпаклевка может быть масляно-клеевой, латексной, акриловой, клеевой или масляной. Каждая разновидность смеси отличается качественными характеристиками, в зависимости от которых решается, для каких работ использовать состав. Если вы никак не можете выбрать, что вам необходимо — шпатлевка или шпаклевка, то стоит знать, что оба этих материала являются одним и тем же, а используются данные составы для выравнивания поверхностей.
В чем отличие?
Если вы задумались над вопросом о том, как пишется — шпаклевка или шпатлевка, то можете употреблять оба данных слова при написании и использовании в речи. Отличие здесь только в орфографических тонкостях употребления названий. Таким образом, шпатлевка образована от слова «шпатель», который является небольшой строительной лопаткой. Изначально слово spatel пришло из немецкого языка, а после укоренилось в русском языке. Оно утвердилось в качестве глагольной формы «шпаклевать», что предполагает нанесение состава с помощью шпателя. По аналогии с данной глагольной формой специалисты, домашние мастера стали произносить само название состава как шпаклевка.
В орфографических современных словарях оба варианта написания слова считаются нормальными. Что касается профессионалов, то наиболее часто в своей лексике они используют слово шпатлевка, что касается разговорной речи, то общеупотребительным является второй вариант.
Описание клеевой шпаклевки
Шпатлевка клеевая имеет однородную пастообразную консистенцию. Данные смеси применяются при проведении внутренних отделочных работ. Перед их нанесением поверхность необходимо хорошо очистить. Использовать в качестве черновой поверхности можно кирпич, бетон, а также штукатурку. Необходимость в использовании смеси возникает при наличии на основании мелких трещин, выбоин, неровностей. После проведения таких работ можно задекорировать стену краской. Если вы до сих пор не определились, что должно быть выбрано в магазине строительных материалов — шпатлевка или шпаклевка, то можете приобретать состав с любым из этих названий. Клеевая смесь обладает высокой белизной, может использоваться для дальнейшей побелки. В ее составе нет олифы. Перед использованием поверхность нужно обезжирить, обеспечить низкий уровень влажности, а также избавить от загрязнений.
Рекомендации по применению шпатлевки
Шпаклевку необходимо наносить равномерно, добиваясь однородного слоя, толщина которого равна 0,3-1 миллиметр. Этап сушки должен происходить при температуре +20 градусов, но не ниже. Каждый слой следует просушить полчаса. Если температура опускается до +15 градусов, то время сушки может увеличиться до 4 часов. Приступать к окрасочным работам следует не ранее чем через сутки после высыхания нанесенного слоя.
Некоторые технические характеристики клеевой шпаклевки
Перед приобретением продукта вам следует учесть расход, который для клеевого состава варьируется в пределах от 300 до 800 граммов на квадратный метр. Конкретное значение будет зависеть от разновидности черновой поверхности. Шпатлевка является пожаробезопасной и нетоксичной. Однако при попадании на кожу ее необходимо смыть водой. Если вы в дальнейшем планируете использовать инструменты, которые применялись в процессе нанесения состава, то их необходимо промыть под проточной водой, исключая высыхание смеси на рабочих поверхностях. После изготовления шпатлевку не рекомендуется хранить более чем 3 месяца. Важно при этом обеспечить температуру в пределах +5 градусов, но не ниже. Не следует допускать замораживания.
Характеристики гипсовой шпаклевки
Шпатлевка гипсовая предполагает расход на квадратный метр в пределах 1,2 килограмма. Данный показатель верен для толщины слоя в 1 миллиметр. Адгезия с основанием отличная, на что указывает цифра, эквивалентная 0,6 МПа. Готовить для нанесения следует ограниченное количество состава, это обусловлено тем, что время «работоспособности» раствора равно 60 минутам. Время полного высыхания составляет 5 часов. Работы разрешается проводить при диапазоне температур от +5 до +30 градусов. Эксплуатироваться поверхность, которая была отделана гипсовой шпаклевкой, может, когда отметка термометра находится в пределах от +5 до +50 градусов.
Область использования гипсовой шпатлевки
Гипсовая шпаклевка применяется при необходимости выравнивания горизонтальных и вертикальных поверхностей, которые выполнены из цемента, пенобетона, гипса, гипсокартона, а также раствора на основе извести и цемента. Использовать смесь можно в сухих помещениях, на стены которых будет наноситься краска или предполагается наклеивать обои. Такая подготовка является идеальной для дальнейшего декорирования.
Заключение
Шпатлевка и шпаклевка представляют собой один и тот же состав, который вы можете использовать для выравнивания разного вида поверхностей. В магазине строительных материалов главное — определиться с назначением смеси, это во многом определяет состав.
Шпаклевка стен — виды и технологии нанесения
В настоящее время при проведении строительных и ремонтных работ в обязательном порядке производятся отделка поверхностей. Специально для этого могут использоваться различные материалы, однако чаще применяется шпаклевка, позволяющая выровнять присутствующие неровности, а кроме того существенным образом продлить ресурс службы всего сооружения. На практике шпаклевка стен выполняется по специальной технологии, где процесс состоит из целого ряда последовательных этапов. В данном случае предстоит рассмотреть, как правильно выполняется шпаклевка стен самостоятельно своими руками.
Виды шпаклевки
Перед тем как рассматривать, сколько по времени сохнет шпаклевка на стенах, потребуется выяснить основные разновидности данного материала, которые можно встретить в свободной продаже на сегодняшний день:
Прежде всего, следует выделить стартовую разновидность состава, которая используется для предварительной отделки перед последующими работами.
Также присутствует финишная отделка, которая применяется в качестве основного облицовочного элемента на сооружениях.
Также в продаже присутствует материал специального применения (часто используется для выравнивания и заделывания трещин).
Фасадная разновидность шпаклевки, которая используется для наружной отделки и обладает соответствующими свойствами.
В зависимости от того, какой характер работ требуется выполнить, может использоваться готовая шпаклевка для покрытия стен, а кроме того смесь, которую впоследствии предстоит смешивать с водой перед использованием.
Важно. Оценивая ситуацию, какой шпаклевкой лучше самостоятельно шпаклевать стены, требуется определиться, какого результата предстоит добиться при использовании такого состава.
Стартовая
В данном случае речь идет про материал, который применяется для улучшения адгезии последующего варианта отделки и самой поверхности конструктивного сооружения. Чаще всего здесь используется смесь, которая впоследствии разводится с водой. Эта разновидность отличается наиболее простой структурой, а кроме того дополнительными компонентами, которые усиливают сцепление отделочного материала с поверхностью.
Финишная шпаклевка
Здесь речь идет об использовании состава, которым на завершающем этапе обрабатывается поверхность. Часто подобные вещества используются для обработки гипсокартона. Состав обладает более приятной структурой, а кроме того часто реализуется в уже готовом состоянии, который перед проведением работы останется только тщательно перемешать строительным миксером.
Шпаклевка специального применения
Здесь речь идет про разновидности составов, которые на практике применяются для выравнивания поверхности, а кроме того заделывания присутствующих трещин в стене. Данный раствор обладает более улучшенной структурой для проникновения. Это позволяет качественно делать сцепление со стеной, а кроме того последующее заполнение присутствующей на поверхности трещины.
Фасадная
Еще один вариант отделочного материала, который используется для обработки конструктивных элементов на улице. Смесь отличается более плотной структурой, которая не пропускает влагу и пары воздуха. Это позволяет существенным образом увеличить ресурс службы сооружений, так как они лучше противостоят пагубному воздействию осадков. Кроме того здесь присутствует структура, которая не предусматривает дополнительную обработку.
Важно. Финишная или другая шпаклевка для стен выпускается с соответствующим назначением, поэтому перед покупкой следует должным образом отнести к выбору подходящего варианта отделки.
Материалы и инструменты
Для того чтобы правильным образом была выполнена шпаклевка стен после проведенной штукатурки или в иной ситуации, предстоит правильно подготовить соответствующий инструмент. В данном случае потребуется следующее:
прежде всего, предстоит подготовить строительный шпатель, которым будет наноситься соответствующая смесь;
также предстоит иметь при себе для такого случая большой шпатель для выравнивания поверхности;
здесь потребуется наличие строительного уровня, чтобы сделать выравнивание поверхности должным образом;
также предстоит использовать структурный шпатель, если наносится финишный вариант отделочной смеси;
необходимо наличие строительного валика, если покрывается поверхность гипсокартона (можно использовать кисть или распылитель).
Инструменты подготавливаются в зависимости от предусмотренного метода нанесения вещества на подготовленную поверхность. В качестве дополнительных материалов предстоит подготовить воду в необходимом количестве, если используется сухой раствор.
Важно. Непосредственно перед применением состав требуется размешать, для чего используется строительный миксер или дрель со специальной насадкой.
Технология
В зависимости от того, какой вариант работы будет выполняться, технология правильной шпаклевки стен может иметь существенные различия. В основном при работе с этим раствором предусматривается следующее:
предварительно выполняется подготовка поверхности стен к шпаклевке;
следующим этапом предстоит подготовить смесь к работе;
далее осуществляется нанесение шпаклевки на поверхность;
раствор кладется в несколько слоев на поверхность;
после полного высыхания потребуется выполнить процесс скобления.
Сама по себе процедура не включает в себя сложных этапов, однако предстоит наносить шпаклевку определенным по толщине слоем, чтобы исключить возможность последующего растрескивания при высыхании. Сам процесс скобления выполняется строительным шпателем или наждачной бумагой.
Заделка трещин на стене
Если выполняется устранение трещин перед последующей поклейкой обоев или иной отделкой, то предусматривается использование стартовой смеси. Здесь предварительно готовится сам дефект к заделке. Следующим этапом подготавливается раствор, после чего равномерно наносится в поврежденную область. Следует использовать достаточное количество материала, а после выровнять поверхность по отношению ко всей конструкции.
Подготовка поверхности к грунтовке
Если будет впоследствии выполняться грунтовка стен под последующую отделку, то предстоит учитывать присутствующие мелкие нюансы. Здесь выбирается соответствующая смесь, которая является стартовой. Ее также разводят, как и в прошлом варианте, после чего равномерно наносят на поверхность стены в несколько тонких слоев. При этом каждый отдельный слой должен тщательно просохнуть перед последующей работой.
Приготовление смеси
Для того чтобы подготовить раствор к предстоящей работе потребуется подобрать соответствующую емкость, после чего насыпать туда небольшое количество шпаклевки и залить соответствующим количеством воды. Далее осуществляется тщательное перемешивание раствора. При необходимости также можно использовать более крупную емкость, в таком случае размешивается состав строительным миксером. Готовая шпаклевка тщательно перемешивается непосредственно перед работой.
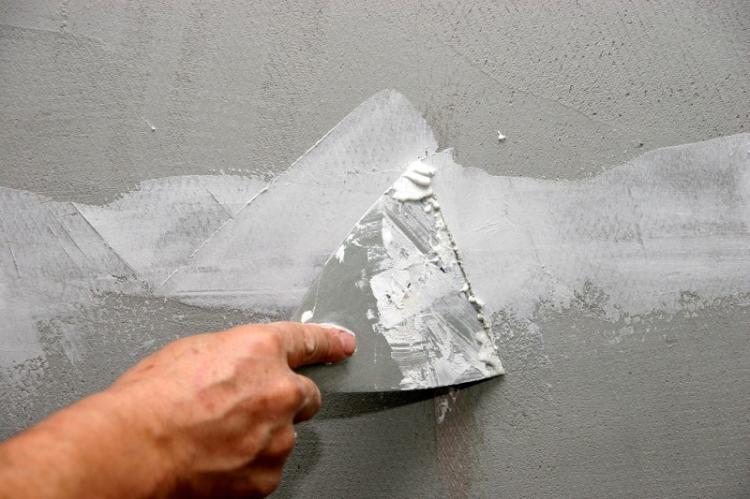
Первичное выравнивание
Если осуществляется изначальное выравнивание поверхности, то смесь предстоит наносить достаточным равномерным слоем. Впоследствии осуществляется выравнивание при помощи длинного строительного шпателя. Также при необходимости смесь можно наносить этим шпателем. Здесь необходимо, чтобы после выравнивания сооружение полностью просохло и только после наносится финишный слой.
Шпаклевание поверхности при помощи маяков
Здесь предстоит расставить в равномерном порядке присутствующие для отделки маяки, которые будут служить конкретными ориентирами для выравнивания поверхности, а кроме того определять, какой по толщине предстоит наносить слой раствора. Впоследствии эти приспособления тщательно замазываются финишным слоем.
Нанесение финишного слоя
В данном случае используется соответствующий вариант материала, а кроме того валик, кисть или распылитель. Этот слой наносится достаточно тонким, чтобы впоследствии можно было выполнить процедуру скобления готового покрытия. На практике достаточно одного равномерного распыления или нанесения при помощи валика или кисти, что позволит достаточно быстро просохнуть покрытию.
Просушка, ошкуривание и шлифования прошпаклеванных стен
В данном случае подразумевается полноценное просушивание, которое выполняется в течение суток. Из-за свойств шпаклевки не рекомендуется использовать строительный фен или иные обогреватели. После полноценного высушивания осуществляется удаление избытков материала. Для этого процесса применяется строительный шпатель или наждачная бумага. Здесь следует использовать инструмент, соответствующий для процесса. Далее осуществляется шлифовка, которую можно выполнить дрелью с алмазным диском или шлифовальной машинкой с соответствующими мягкими насадками.
Важно. В процессе работы рекомендуется уделять особое внимание на равномерное выполнение действий, чтобы впоследствии отсутствовали какие-либо перепады и неровности.
Особенности технологий шпаклевания
В процессе выполнения работы рекомендуется принимать во внимание некоторые особенности касательно проводимого процесса работы с этой строительной смесью. В зависимости от того, какой вариант отделки производится, предусматриваются соответствующие нюансы.
Под обои
В данном случае используется соответствующая смесь, которая обладает усиленной адгезией. При этом раствор наносится достаточно тонким слоем, так как обои будут создавать дополнительную нагрузку на сооружение. Здесь в обязательном порядке выполняется шлифовка, чтобы улучшить сцепление клея с подготовленной поверхностью.
Под покраску
В отличие от варианта с обоями, здесь предстоит потрудиться с выравниванием, так как обычное лакокрасочное покрытие не способно скрыть неровности. Дополнительно предстоит учитывать тот факт, что под покраску используется специальная разновидность вещества с соответствующей структурой, что позволит надлежащим образом лакокрасочному покрытию сцепляться со стеной.
Гипсокартон
В этой ситуации предстоит использовать финишный вариант состава, который благодаря своей структуре скроет невзрачный вид отделочного материала. Часто используется готовая смесь, при этом для ее нанесения на поверхность применяют валик, кисть или вовсе распылитель для краски. Наносить вещество необходимо тонким слоем, после чего выполняется скобление и шлифовка.
Использование армирующей сетки
Этот дополнительный элемент позволяет существенно сократить количество расходуемого вещества на квадратный метр. На практике сетка укладывается равномерно на сооружение и позволяет скрыть присутствующие неровности. Впоследствии сверху наноситься соответствующий слой шпаклевки. Это позволяет устранить даже наиболее крупные дефекты. Сама по себе сетка надежным образом фиксируется по всему периметру, а кроме того с равномерными отступами по обрабатываемой площади. Также после полноценного выравнивания наносится финишный слой отделки.
Обработка углов
В такой ситуации используются обычные металлические уголки, которые задают сооружению необходимый угол. Впоследствии равномерным слоем наносится финишное покрытие, которое скрывает металлический элемент. Подобная технология часто применяется возле оконных проемов, а кроме того в процессе создания новых углов. Что касается внутренних пространств, то это выполняется в обратном порядке с соответствующим количеством смеси и порядком ее распределения по поверхности.
Финишная шпаклевка стен своими руками видео
90000 Download Putty (0.74) for Windows, Linux and Mac 90001
90002
Content
90003 90002 90005 A step by step guide to Download PuTTY on Windows and installing. 90006 90003
90002 PuTTY, a popular terminal emulator, is an open-source, light-weight, and free SSH client. It was developed by Simon Tatham in C language.Its primary function is to connect to a computer remotely while offering the facilities of transferring files, manipulating data, etc. 90003
90002 It offers support to a variety of network protocols like SSH, Telnet, Serial, SCP, SFTP, etc. PuTTY also comes with a command-line tool called «90005 psftp 90006» which can securely transfer files between computers over an SSH connection. It is compatible to use in most of the operating systems (for both 32 bit and 64 bit).90003
90002 90005 The List of Operating Systems that support PuTTY: 90006 90003
90018
90019 Windows 95, 98 90020
90019 Windows ME, NT 90020
90019 Windows 2000, 2003, 2008 90020
90019 Windows XP 90020
90019 Windows Vista 90020
90019 Mac OSX 90020
90031
90002 90005 Use of PuTTY 90006 90003
90002 In a multi-user operating system like Unix, the interface is generally of command-line type, just like the command prompt or MS-DOS.As such the user needs to type in the command in the command line program to get anything processed by the system. 90003
90002 Generally, these commands can quickly be run over a network from a different computer on a different location (client) and the response is transferred over the network to the client. 90003
90002 The arrangement mentioned above is made possible with the help of network protocols like SSH, Telnet, Rlogin, etc. Interestingly, users can give commands to multiple computers simultaneously.90003
90002 SSH (Secure Shell) protocol is a cryptographic network protocol that allows you to access an internet server while encrypting any information sent to that server. Some of the other protocols include Telnet, Rlogin only if either you are connected to a Unix system or you have a login account on a web server (a shell account). PuTTY is one such application that enables this kind of transfer. 90003
90002 90005 PuTTY supports the following protocols 90006 90003
90018
90019 SCP (Secure Copy) 90020
90019 SSH (Secure Shell) 90020
90019 Telnet 90020
90019 Rlogin 90020
90019 Raw socket connection.90020
90031
90060 Download PuTTY for Windows Operating System (Released 27 June 2020) 90061 90002 Following are the steps required to download and install the latest version of PuTTY for Windows operating system: 90003 90002 Choose the appropriate windows installer version (32-bit or 64-bit) and click on it. 90003
90066
90067 90005 Download Alternative Binary Files for PuTTY (Windows) 90006 90070 90002 PuTTY installer for windows will be downloaded shortly.You’ve successfully downloaded PuTTY on Windows. 90003
90067 Installing PuTTY on Windows 90070
90002 Once it is successfully downloaded on Windows than follow the following steps to install the software: 90003
90002 Double click on the downloaded .msi file and being with the setup process. 90003
90079
Installing PuTTY in Windows — (step 1)
90002 Click on next and then select the path for the installation.90003
90082
Installing PuTTY Release in Windows — (step 2)
90002 Select the product feature you want to be installed in your system and click on install. 90003
90085
Install PuTTY Files (Step 3)
90002 Click on Finish to complete the setup and close the dialog box.90003
90088
Complete Installing PuTTY in Windows
90002 Voila! You are done with the installation. 90003
90060 Using SSH in PuTTY (Windows) 90061
90002 Following the successful installation, navigate to the location folder where you have installed the application and run the .exe file. 90003
90095
PuTTY Configuration
90096 90005 1.Manage Session in PuTTY 90006 90099
90002 It is the preliminary panel where you get to specify specific options to open a session. 90003
90018
90019 The 90005 Host Name (or IP Address) 90006 bar is where a user will input the name or IP address of the server they want to connect. 90020
90019 90005 Connection type 90006 of radio buttons allows users to choose from the kind of network they are planning to connect.90020
90019 The Port bar is the section that is filled automatically on selecting the type of connection. However, if you choose the 90005 Raw 90006 type, the bar stays blank and requires the user to enter the 90005 port 90006 manually. 90020
90019 Upon selecting Serial as the connection type, the 90005 Host Name and Port bars 90006 will be replaced by 90005 Serial Line and Speed 90006. 90020
90031
90002 The «90005 Load, save or delete a stored session» 90006 section is to set some connection setting without having to type all the details again when needed.90003
90018
90019 Once you save it, it can just select on the saved session and click on Load. The saved settings will appear on their respective boxes in the configuration panel. 90020
90019 The panel permits to modify a saved session by first loading a session, editing everything you want to change and then clicking on «save» button. 90020
90019 Users have the option to delete a session as well.90020
90031
90002 The 90005 Close Window On Exit 90006 option helps in deciding whether the PuTTY terminal will close as soon as the session ends or restarts the session on the termination. 90003
90096 2. What is Logging in PuTTY? 90099
90002 This configuration panel saved the log files of your PuTTY sessions which can be used for debugging and analysis purposes. Users can choose the type of data you want to log in this window.90003
90096 3. What is Terminal in PuTTY? 90099
90002 The section has a variety of options to decide how the texts in the window should appear. Whether you want the text to come in the next line as soon as it reaches the right edge of the window or you want to interpret the cursor position. 90003
90096 4. Configure Keyboard setting in PuTTY. 90099
90002 With the option, users can modify the behavior of ‘backspace,’ ‘home’ and ‘end’ keys, and several other keys to coordinate with the server settings.90003
90096 5. What is Bell in PuTTY? 90099
90002 It lets PuTTY make an alert sound as and when you want it to function. 90003
90096 6. Features of PuTTY 90099
90002 Users can choose to disable or enable some of the advanced terminal features of PuTTY like disabling cursor keys, etc. using the function. 90003
90096 7. Adjust the size of Window in PuTTY.90099
90002 The option allows to predefine a fixed size of the PuTTY window and control the scrolling. Many other configurations can be made using this feature. 90003
90096 8. Change the Appearance of PuTTY 90099
90002 Under this panel, the appearance of the cursor, the font in the terminal window or even control the window border can be changed. 90003
90096 9. What is PuTTY Behaviour? 90099
90002 Enables to change the title of the window, control the warning window operation, etc.90003
90096 10. What is Translation in PuTTY? 90099
90002 The «90175 Remote Character Set» 90176 lets you select how to interpret the information received from the server. 90003
90096 11. What is Selection in PuTTY? 90099
90002 Users can change the course of copy-pasting or the actions of mouse-buttons in Unix environment by making appropriate changes in this panel. 90003
90096 12.How to Adjust Colours in PuTTY? 90099
90002 You can control the color of background as well as of the texts using this panel. 90003
90096 13. Configure Connection in PuTTY. 90099
90002 The panel has options that solve any issues when closing of connections while a window is idle. With the option, users can select between the old and new protocols. 90003
90096 14. Manage Data in PuTTY.90099
90002 The auto-login option dismisses the need to type the username every time. It can also specify the terminal needs using this panel. 90003
90096 15. A proxy setting in PuTTY 90099
90002 Permits configuration of various types of proxies used while making the network connections. 90003
90096 16. What are Telnet, Rlogin, and SSH in PuTTY? 90099
90002 These panels allow configuration of session-related options like changing the mode for negotiation between the server and client, allowing an automated form of login on the server, etc.90003
90002 The above were details about the panels and the steps to install PuTTY client on windows. 90003
90204 90002 PuTTY, the open-source and free to download software, provides an easy way to access a Unix shell environment from a windows system. Unlike Unix, Windows do not have any SSH server or client pre-installed. The network file transfer application supports many protocols including the popular SSH and Telnet clients.90003
90060 PuTTY for Linux 90061
90002 PuTTY is not only limited to Windows OS, but it’s popular among Linux users too. The Linux version is a graphical terminal program which is not pre-installed in most of the Linux distributions. 90003
90002 In various enterprises, many IT projects have their development environment on a remote Linux system where Windows is used as the local system. Why PuTTY? There is already a Linux terminal in the Linux Operating System.Even then, why an SSH tool like PuTTY is preferred? 90003
90018
90019 The interface of PuTTY makes it a favorite choice among the users since most of them are accustomed to operating the application on Windows. 90020
90019 It has the option of connecting to raw sockets and serial ports. 90020
90019 Saving various sessions and loading them in one go is the main highlighting feature of PuTTY that its users swear by since it is difficult to edit sessions whenever logging-in manually.90020
90031
90060 Install PuTTY on Linux 90061
90002 On a Linux-based system, PuTTY can easily be installed via terminal. Let us look at the steps of installing the server application on a Ubuntu machine. 90003
90002 1. As a prerequisite, it is necessary to make sure whether the universe repository of Ubuntu is enabled or not. 90003
90002 Type the command: 90003
90229 sudo add-apt-repository universe 90230
90002 and hit enter.90003
90002 2. Generally, PuTTY is already available in the repository of Ubuntu. Before starting with the installation process, update the packages and repositories of Ubuntu using the command: 90003
90229 sudo apt-get update 90230
90002 90005 Note: 90006 90175 The command would make sure that Ubuntu installs the latest version of PuTTY, in case, it might install the older versions of the software. The word «90176 sudo» 90175 in the command is used to instruct the terminal to run the update command as «root» since a user might not have privileges to get going with the installation and updation.It will prompt you to enter the username and password if you have the required access. 90176 90003
90002 3. Now, run the command: 90003
90229 sudo apt-get install PuTTY 90230
90002 It will complete the installation by installing the application tools. 90003
90002 4. A prompt will asked if you want to continue the installation. 90005 Press ‘y’ 90006. 90003
90002 5.PuTTY tools will be unpacked and set up in the further process. 90003
90002 6. To confirm if that the installation is successful, run the command: 90003
90229 sudo dpkg -l PuTTY 90230
90002 It will display information about the application such as version, architecture, and description. 90003
90067 90005 Installation of PuTTY on other Linux distributions 90006 90070
90002 In Debian based Linux system, use apt-get or aptitude to install the server application PuTTY.The command is: 90003
90229 sudo apt-get install PuTTY 90230
90002 PuTTY can easily be installed on Arch-based Linux system. The command for installing is: 90003
90229 sudo pacman -S PuTTY 90230
90002 It is also available for installation on Fedora or Red Hat based Linux system, and the default package manager does that job for it. The command is: 90003
90229 sudo dnf install PuTTY 90230
90067 90005 Working on PuTTY on Linux 90006 90070
90002 Now that you have installed PuTTY, working on it is pretty simple too.90003
90285
90019 Just type the command «PuTTY» on the shell prompt. It will open the PuTTY SSH client application. 90020
90019 After opening it, enter the IP address or the hostname of the computer or any device you want to connect on Hostname field. 90020
90019 Next, select the required connection type, like SSH, Raw, Telnet, Rlogin, Serial, etc. 90020
90019 For security reasons, a prompt will ask to confirm the connection.Just click ‘yes’ to continue. 90020
90019 Now, you will be connected to your remote system. It will further ask for credentials — username and password, to make sure that you are authorized to connect to the system. 90020
90019 In Linux, the application can also be opened by searching in the Computer Box. 90020
90019 The Linux version of the program almost looks and feels exactly like the windows version.90020
90300
90067 90005 SSH Key Management in PuTTY on Linux 90006 90070
90002 Public key authentication is also supported by PuTTY. Public key authentication is used for interactive and automated connections. It offers a higher cryptographic strength which is difficult to achieve with long passwords. For generating a private key for authentication, the PuTTYgen tool is used. 90003
90002 Open PuTTYgen and run the following command to get public key authentication enabled: 90003
90229 puttygen -t rsa -b 2048 -o thekey.ppk 90230
90002 To get the public key use the following command: 90003
90229 puttygen -L thekey.ppk 90230
90002 Hence, that was all about installing and getting started with PuTTY on Linux based systems. 90003
90204 90002 PuTTY is a free, highly configurable and open-source SSH client which makes it convenient to connect to a remote server and transfer files over the network.Mainly aimed for the use of programmers and network administrator, it helps establish secure connections when transferring data over the network. 90003
90002 Apart from SSH, the application supports many other protocols like SCP, Telnet, Raw Socket Connection, etc. Additionally, it can also connect to a serial port. While it supports many variations on the secure remote terminal, it also facilitates user control over SSH encryption key and protocol versions. 90003
90060 PuTTY for Mac 90061
90002 Let’s talk about the steps to install PuTTY on a MAC operating system.As a prerequisite, users need the following application installed on the system: 90003
90285
90019 Command-line Tools 90020
90019 X-CODE 90020
90019 MacPorts 90020
90300
90067 Install Putty on a Mac using Command-line Tools 90070
90002 MAC users have this facility to use a Unix toolkit. Users have to use the terminal to access the kit.The tool package gives its users many tools, utilities, and compilers that include GCC, Perl, svn, git, etc. Many of the commands are found on Linux installations by default. Let’s look at the steps to install it. 90003
90285
90019 To begin with, the installation, go to the Apple Developer website. 90020
90019 Login and in the download section and search for Command Line Tools. 90020
90019 Install the.dmg file. 90020
90300
90067 Use X-Code to install Putty for mac 90070
90002 It’s an IDE (Integrated Development Environment) specially designed for MAC OS. It consists of a suite of software development tools for developing software for MAC OS, iOS, WatchOS, and tvOS. 90003
90002 It also supports source codes from programming languages like C, C ++, Java, Python, Ruby, etc. It’s available on the app store.So, go to app store, search for «x-code» and click on «get.» 90003
90067 Install Putty for mac using MacPorts 90070
90002 It’s open-source software designed to simplify the installation of other software. One can install some packages by entering a command in the terminal, which will download, compile and install the requested software. It also installs any required dependencies related to the software automatically. 90003
90018
90019 Download MacPorts from here.90020
90019 A pkg file will be downloaded. Just double-click to install it. 90020
90031
90060 Download PuTTY for Mac and Installation 90061
90002 After installing the tools, let’s get to the PuTTY installation part. 90003
90002 1. You need to accept the Licence Agreement of X-Code before using it. So, open the terminal from the utility section. It’s just like command line on Linux.90003
90002 2. Type the command: 90003
90229 sudo xcodebuild -license 90230
90002 By running this command, the Xcode License will be viewed / accepted on behalf of all accounts on the Mac. 90003
90002 3. Press enter to view the License agreement and type «90005 agree 90006.» A line on the terminal will say «You can view the license agreements in x-code About box.» 90003
90002 4.Update MacPorts by typing: 90003
90229 sudo port -v self-update 90230
90002 to make sure that x-code is fully installed. Now, the Mac system is ready to install PuTTY. 90003
90002 5. Type the following command 90003
90229 sudo port install putty 90230
90002 in the Terminal and run the command. It will download some of the dependencies of PuTTY. 90003
90002 6.Type: 90003
90229 putty 90230
90002 in the terminal to launch the application. Running the command would open PuTTY in an X11 window. 90003
90002 7. To copy PuTTY to the desktop as a shortcut icon, type the following command 90003
90229 cp / opt / local / bin / putty ~ / Desktop / putty 90230
90002 and hit enter. 90003
90002 8. A desktop icon will be on the desktop which opens the PuTTY configuration box.90003
90002 90005 Following the installation 90006 users can start connecting to servers by adding the IP address and the port (depending on the type of connection you want to make) of the server. 90003
90002 Users can even save sessions containing the IP address of the servers, which would need to be accessed multiple times. Once connected, users can create, update or manipulate with the data present on the server, given that you have the necessary rights to perform those actions.90003
90002 PuTTY client is one of the best SSH clients as it offers a variety of features like logging, cursor formatting, keyboard formatting, alert sound, resizing the terminal window, changing the actions of mouse buttons, configuring proxies, configuring session-related options, auto-login facility and much more. 90003
90002 However, alternatives to PuTTY can be found here. 90003
.90000 a free SSH and Telnet client 90001
PuTTY: a free SSH and Telnet client 90002 90003 Home 90004
| FAQ
| Feedback
| Licence
| Updates
| Mirrors
| Keys
| Links
| Team
90005 Download: Stable
· Snapshot
| Docs
| Changes
| Wishlist
90006 90007
PuTTY is a free implementation of SSH and Telnet for Windows and Unix
platforms, along with an 90008 xterm 90009 terminal emulator. It is
written and maintained primarily by
Simon Tatham. 90006 90007
The latest version is 0.74.
90003 Download it here 90004. 90006 90007 90003 LEGAL WARNING 90004:
Use of PuTTY, PSCP, PSFTP and Plink is illegal in countries where
encryption is outlawed. We believe it is legal to use PuTTY, PSCP,
PSFTP and Plink in England and Wales and in many other countries, but
we are not lawyers, and so if in doubt you should seek legal advice
before downloading it. You may find useful information at
cryptolaw.org, which collects
information on cryptography laws in many countries, but we
can not vouch for its correctness.90006 90007
Use of the Telnet-only binary (PuTTYtel) is unrestricted by any
cryptography laws. 90006 90021 Latest news 90022 90007
90003 2020-06-27 PuTTY 0.74 released 90004 90006 90007
PuTTY 0.74, released today, is a bug-fix and security release. It
fixes bugs in 0.73, including one possible vulnerability, and also
adds a
new configuration option
to mitigate a minor information leak in SSH host key policy. 90006 90007
90003 2019-09-29 PuTTY 0.73 released 90004 90006 90007
PuTTY 0.73, released today, is a bug-fix release. It fixes a small number of bugs since 0.72, and a couple of them have potential security implications. 90006 90007
90003 2019-07-20 PuTTY 0.72 released 90004 90006 90007
PuTTY 0.72, released today, is a bug-fix release. It fixes a small
number of further security issues found by the 2019 EU-funded
HackerOne bug bounty, and a variety of other bugs introduced in 0.71. 90006 90007
90003 2019-07-08 Bug bounty concluded 90004 90006 90007
The EU-funded bug bounty programme is now closed.Many thanks to
everybody who sent in reports! 90006 90007
Anyone with a vulnerability to report should now go back to reporting
it in the old way, via email to the PuTTY team, as described on the
Feedback page.
If you think it needs to be reported confidentially, encrypt it with
our Secure Contact Key. 90006 90007
90003 2019-03-25 Bug bounty continues 90004 90006 90007
This year’s EU-funded bug bounty programme is 90054 still
running 90055. It was originally scheduled to end on 7th March, but
there was money left over in the budget.So while that money lasts,
you still have a chance to earn some by finding vulnerabilities in
PuTTY 0.71 or the development snapshots! 90006 90007
As before, vulnerabilities should be reported through the
HackerOne web site
in order to qualify for a bounty: if you send reports directly to the
PuTTY team in the usual way, then we’ll still fix them, but we can not
provide money for them. 90006 90007
90003 2019-03-16 PuTTY 0.71 released 90004 90006 90007
PuTTY 0.71, released today, includes a large number of security fixes,
many of which were found by the recent EU-funded HackerOne bug bounty.There are also other security enhancements (side-channel resistance),
and a few new features. It’s also the first release to be built for Windows on Arm. 90006 90007
90003 2019-01-18 EU bug bounty for finding vulnerabilities in PuTTY 90004 90006 90007
From now until 7th March, you can earn money by reporting security
vulnerabilities in PuTTY! 90006 90007
HackerOne is running a bug
bounty programme for PuTTY, funded by the European Union as part
of the ‘Free and Open Source Software Audit’ project
(EU-FOSSA 2).If you report a vulnerability through their web site, it
may qualify for a bounty. (The exact amount will depend on how serious
the problem is, and there’s also a bonus for providing a patch that
fixes it.) 90006 90007
For more details, or if you have something to report, see the link
above. 90006 90007
(Please note that HackerOne will only consider vulnerabilities
reported 90076 to them 90077. If you send a report directly to the PuTTY
team in the usual way, then of course we’ll still fix it, but we can not
also arrange for you to get paid.) 90006 90007
90003 2018-08-25 GPG key rollover 90004 90006 90007
This week we’ve generated a fresh set of GPG keys for signing PuTTY
release and snapshot builds. We will begin signing snapshots with the
new snapshot key, and future releases with the new release key. The
new master key is signed with the old master keys, of course. See
the keys page for more information. 90006 90007
90003 2017-07-08 PuTTY 0.70 released, containing security and bug fixes 90004 90006 90007
PuTTY 0.70, released today, fixes further problems with Windows DLL
hijacking, and also fixes a small number of bugs in 0.69, including
broken printing support and Unicode keyboard input on Windows. 90006 90021 Site map 90022 90093
If you want to comment on this web site, see the
Feedback page.
90005 (last modified on Sat Jun 27 8:28:13 2020)
.90000 How to Use PuTTY on Windows 90001 90002 This page is about the PuTTY SSH client on Windows. For information about PuTTY on Mac, see the PuTTY Mac page. For PuTTY on Linux, see the PuTTY Linux page. 90003 90002 This page explains how to use the PuTTY terminal window on Windows. How to configure PuTTY, how to create and save profiles, and what configuration options to change. Advanced topics, such as configuring public key authentication, are also addressed. 90003 90006 Getting and installing 90007 90002 You can download a copy of the software for the Windows platform from the download page.Detailed installation instructions are provided on the installation instructions page. 90003 90006 Running PuTTY and connecting to a server 90007 90002 If you selected to create a desktop icon during installation, you can start the software simply by (double-) clicking on the icon. Otherwise, open the software from the Windows 90013 Start 90014 menu. 90003 90002 When the software starts, a window titled 90013 PuTTY Configuration 90014 should open. This window has a configuration pane on the left, a 90013 Host Name (or IP address) 90014 field and other options in the middle, and a pane for saving session profiles in the lower right area.90003 90002 For simple use, all you need to do is to enter the domain name or IP address of the host you want to connect to in the 90013 Host Name 90014 field and click 90013 Open 90014 (or press Enter). A domain name looks like 90027 students.example.edu 90028. An IP address looks something like 90027 78.99.129.32 90028. 90003 90006 What if you do not have a server 90007 90002 If you do not have a server to connect to, you can try Tectia SSH on Windows or OpenSSH on Linux. 90003 90006 Security alert dialog box 90007 90002 When you connect to a server for the first time, you are likely to see a 90027 PuTTY Security Alert 90028 dialog about the server’s host key not being cached in the registry.This is normal when you are connecting to a server for the first time. If you ever get this with a server, it could mean that someone is trying to attack your connection and steal your password using a man-in-the-middle attack. 90003 90002 But as said, the first time you connect, this is normal, and you should just click 90013 Yes 90014. If you want to be fancy, you can check the displayed key fingerprint and make sure it is the same that is used by the server. In real life, almost nobody does that.It is more secure to use a proper SSH key management solution anyway. 90003 90006 Terminal window and login credentials 90007 90002 After the security alert, you should get a terminal window. By default, this is a black, very bland window. It should first ask for your user name and then password. After these, you should get a command line on the server. 90003 90002 You can then type into the terminal Window. You are now connected to the server, and anything you type in the Window is sent to the server.Server’s responses are displayed in the Window. You can run any text-based applications on the server using the window. The session terminates when you exit the command-line shell on the server (typically by typing 90027 exit 90028) to the command line or pressing 90027 Control-D 90028. Alternatively, you can forcibly terminate the session by closing the terminal window. 90003 90006 Configuration options and saved profiles 90007 90002 The initial configuration window contains a lot of options.Most of them are not needed in normal use. 90003 90060 Port 90061 90002 The 90013 port 90014 field specifies the TCP / IP port to connect. For SSH, this is the port on which the SSH server runs. Normally it can be left to 22. If for some reason you need to connect to a different port number, just change the value. Usually only developers would change this to a different value, but some enterprises are known to run SSH servers in non-standard ports or to run multiple SSH servers on the same server at different ports.90003 90060 Connection type 90061 90002 The 90013 Connection type 90014 selection almost never needs to be touched. Just leave it as 90013 SSH 90014. SSH is a secure, encrypted communications protocol designed to ensure your password and data are maximally protected. 90003 90002 90013 Raw connections 90014 might be used for developers to connect a TCP / IP socket for testing (e.g., when developing a network application that listens on a TCP / IP port). 90003 90002 90013 Telnet 90014 is an old legacy protocol that is almost never used, unless you manage equipment that is more than 10 years old.Telnet is not secure. Passwords are sent in the clear on the network. Attackers can easily eavesdrop on plaintext communications and steal user names and passwords. 90013 Rlogin 90014 is another legacy protocol with similar woes. 90003 90002 90013 Serial 90014 refers to a serial port, another legacy communications mechanism for connecting computers to peripheral devices. Most PCs these days no longer have serial ports, but they are still sometimes used for controlling physical equipment, instrumentation, machinery, or communications devices.Another use for serial ports is debugging operating systems or embedded software. 90003 90060 Load, save, or delete a stored session 90061 90002 This section allows you to save your settings as named profiles. Just write the name of your new profile in the 90013 Saved Sessions 90014 box and click 90013 Save 90014 to create a new profile. The host name and your other settings are saved in the profile. 90003 90002 Saved profiles appear in the larger box below it. Initially it will contain just 90013 Default Settings 90014.Profiles you save will be included there. Select a profile and click 90013 Load 90014 to use a previously saved profile. Select a profile and click 90013 Delete 90014 to delete a profile that is no longer needed. 90003 90060 Close window on exit 90061 90002 Finally, the 90013 Close window on exit 90014 setting specifies whether the terminal window should be automatically closed when the connection is terminated. There is rarely any need to change it from the default value of 90013 Only on clean exit 90014.90003 90006 Left pane configuration options 90007 90002 More options can be found in the left pane titled 90013 Category 90014. Select a category from the tree, and the right pane will change to show configuration options for that category. The initally shown options belong to the 90013 Session 90014 category. 90003 90002 Only the more relevant options are described here. There are lots of options, and most of them would never be used. 90003 90060 Terminal options 90061 90002 The options in this category influence terminal emulation and keyboard mappings.They are largely self-explanatory, and will not be covered here. Very few people need to touch these. Some people may change how the 90013 bell 90014 character is handled; people using exotic operating systems might change what is sent by the 90013 backspace 90014 or 90013 delete 90014 character. 90003 90060 Window options 90061 90002 The window options influence the appearance and behavior of the terminal window. It can also specify how characters are translated on output and to select fonts and colors for the window.90003 90006 Connection options 90007 90002 Of the connection options, the 90013 Data 90014 options can be useful. The 90013 Auto-login user name 90014 specifies the user to log in as, so that the name will not have to be entered every time. The 90013 Proxy 90014 options are rarely useful for home users, but may be needed in enterprises that do not allow outgoing Internet connections without using a SOCKS proxy or other similar mechanisms. Do not worry if you do not know what a SOCKS proxy is; just stay out of that section.90003 90002 The 90013 Telnet 90014, 90013 Rlogin 90014, and 90013 Serial 90014 categories only contain options for those protocols, and very few people would ever use them. 90003 90002 The 90013 SSH 90014 options, however, are important and useful for some people. The ordinary user or student need not worry about them. But if you want to use public key authentication, then they are needed. Note that 90013 you need to open the SSH options subtree 90014 by clicking on the small 90027 [+] 90028 symbol.Otherwise you will not see all the options. 90003 90060 Key exchange, host keys, and cipher options 90061 90002 You almost never want to touch the Kex (key exchange), Host Keys, or Cipher options. They all have reasonable default values, and most people do not know enough about cryptography to select any better values. Thus just skip these options, unless you know what you are doing. 90003 90060 Authentication options — public key authentication 90061 90002 The 90013 Auth 90014 subtree contains some options that may be useful.When 90013 Auth 90014 is clicked, it shows a pane titled 90013 Options controlling SSH authentication 90014. To enable public key authentication, you just generate an SSH key and then click the 90013 Browse 90014 button in the 90013 Authentication parameters 90014 box in the middle right area of this configuration pane. For more information, see also configuring public key authentication for PuTTY. Advanced users may also want to check the 90013 Allow agent forwarding 90014 checkbox to use key-based single sign-on.90003 90002 Most users have no need to generate SSH keys and need not know what public key authentication is. System administrators, however, should learn it and should also familiarize themselves with SSH key management and ensure their organization implements proper provisioning and termination processes and audits for SSH keys. 90003 90060 Active Directory authentication (GSSAPI / Kerberos) 90061 90002 One of the interesting features of PuTTY is support for Active Directory single sign-on.Technically it uses the Kerberos protocol via a programming interface called GSSAPI. In the SSH protocol, the mechanism is called GSSAPI authentication. Enterprise users using Kerberos authentication (e.g., via the Centrify or Quest Authentication Services aka Vintela) may want to take advantage of the single-sign-on capability. Other users do not need to care. The settings for GSSAPI authentication can be found under the 90013 SSH 90014/90013 Auth 90014 section. Note that you must again expand the 90013 Auth 90014 section by clicking on the 90027 [+] 90028 symbol to see the GSSAPI options.90003 90060 X11 forwarding options 90061 90002 X11 is a protocol and system for running graphical applications on Unix and Linux. It supports running graphical applications remotely over a network out-of-the-box. 90003 90002 PuTTY does not implement an X11 server (the display side), but it can work with some other product that implements X server functionality on Windows. A popular free alternative is XMing. 90003 90002 To use an X11 server, you need to check the 90013 Enable X11 forwarding 90014 box and enter 90013 localhost: 0.0 90014 in the 90013 X display location 90014 box. The other settings need not be touched. Detailed instructions can be found, e.g., here. 90003 90060 Tunneling options 90061 90002 The final category of configuration options we’ll discuss is 90013 Tunnels 90014. They are used for configuring SSH tunneling, also called SSH port forwarding. This panel can be used for defining forwardings for the connection. Forwardings are saved in the profile. 90003 90002 To add a local forwarding (i.e., TCP / IP port on local machine forwarded to a port on the remote machine or to a machine reachable from the remote machine), write the source port in the 90013 Source port 90014 field, the destination host and port (eg, 90027 www.dest.com:80 90028) in the 90013 Destination 90014 field, and select 90013 Local 90014. The click 90013 Add 90014. 90003 90002 To add a remote forwarding (ie, a TCP / IP port on the remote machine forwarded to a port on the local machine or to a machine reachable from the local machine), specify 90013 Source port 90014 on the destination machine and 90013 Destination 90014 that is reachable from the local machine (your desktop).90003 90002 Normally you need not check 90013 Local ports accept connections from other hosts 90014 or the same for remote ports. However, if the connection to the forwarded port is from a over a network instead of from 90027 localhost 90028, then you need to check these. There is a small security risk, but usually it is not a problem in the cases where SSH tunneling is used. However you should understand that anyone who can connect to the respective computer can then connect to the forwarded port.In some cases port forwarding can be used to traverse firewalls. We suggest you read our article on the risks of SSH port forwarding. 90003.90000 PuTTYgen Download 90001
90002
PuTTYgen is a key generator tool for creating pairs of public and private SSH keys. It is one of the components of the open-source networking client PuTTY. Although originally written for Microsoft Windows operating system, it is now officially available for multiple operating systems including macOS, Linux. PuTTYgen.exe is the graphical tool on Windows OS. While on the other side, Linux OS has the only command-line version could be accessible using SSH commands.90003 90004
90002
Contents
90004
90007 Puttygen 90008 aka 90009 Putty Key Generator 90010
90002 The key generation utility — PuTTYgen can create various public-key cryptosystems including Rivest-Shamir-Adleman (RSA), Digital Signature Algorithm (DSA), Elliptic Curve Digital Signature Algorithm (ECDSA), and Edwards-curve Digital Signature Algorithm (EdDSA) keys.90004
90002 The aforementioned public-key cryptosystems principally focus on secure data transmission and digital signatures. 90004
90002 Although PuTTYgen collects keys in its native file format i.e. .ppk files, the keys can easily be converted to any file format. For Windows, the software interface is PuTTYgen.exe, whereas, for Linux OS the command-line adaptation is available using SSH commands. 90004
90007 How to use PuTTYgen? 90010
90002 PuTTYgen is used to generate public or private key pair for creating SSH keys.Below is the complete guidance about how to generate RSA key in the Windows operating system: 90004
90021
90022 Once you install the PuTTY on your machine, you can easily run PuTTYgen. For the same, go to Windows -> Start Menu -> All Programs -> PuTTY -> PuTTYgen. 90023
90022 You will see the PuTTY key generator dialog box on your screen 90023
90022 You will find a «Generate» button in that dialog.Clicking on it will lead to generating the keys for you. 90023
90022 Now you will need to add a unique key passphrase in the Key passphrase and Confirm passphrase field. 90023
90022 Click on the «Save Public Key» and «Save Private Key» buttons to save your public and private keys. 90023
90022 You will see the text starting with ssh-RSA in the Public key for pasting into OpenSSH authorized_keys file field which is located at the top of the window.Copy that entire text to your clipboard by pressing ctrl + c as you will require the key to paste on your clipboard in the public key tool of control panel or directly on the cloud server. 90023
90034
90002 90036 Various Ways to Use RSA Key Pair 90037 90004
90002 RSA key pair generated through PuTTYgen is used in two various ways defined as below: 90004
90021
90022 90036 To assign while creating a new cloud server 90003 90037 You can choose the public key from the given list of keys at the time of creating a cloud server.If you do not find your key in that list, then first add and then assign it. 90023
90022 90036 Assign to an existing cloud server 90003 90037 At the time of connecting to the cloud server, first of all, you need to tell PuTTY to use it for utilizing your newly created RSA key pair. 90023
90034
90002 PuTTYgen being a component of the terminal emulator PuTTY does not have to be downloaded separately, hence, comes with the PuTTY.msi installation package. You can follow the simple steps to download PuTTYgen software for your system. That is the reason why you do not need to 90008 download PuTTYgen 90009 separately. Once you download PuTTY software, you will be able to install and run PuTTYgen easily in no time. Below is the complete instruction about how to download and install PuTTY on Windows. 90004
90002 Apart from that, it is also integrated into third-party programs such as WinSCP installation package.Below you can find a complete PuTTYgen download and installation guide for all operating systems. 90004
90007 Download PuTTYgen on Windows 90010
90002 To download PuTTYgen the primary requisite is to acquire the copy of PuTTY installation package. For the 64-bit operating system, one must install the 64-bit version of PuTTY, i.e. putty-64bit- -installer.msi.Similarly, for the 32-bit operating system, the respective 32-bit version of PuTTY, i.e. putty- -installer.msi needs to be installed. 90004
90002 To get PuTTY, go to PuTTY Installation Download page, whereby the complete installation package will be available with setup instructions, installation guide, and download links to all other components of PuTTY such as putty.exe, pscp.exe, psftp.exe, puttytel.exe, plink.exe, pageant.exe and putty.zip. 90004
90002 Following the successful download of the PuTTY installation package.It is time to install the program. Go to How to install PuTTY on Windows, whereby you will find the step by step guidance for PuTTY installation for Windows operating system. 90004
90002 After successfully downloading and installing PuTTY on your Windows machine, you are just 2-3 clicks away to run PuTTYgen. Follow the below-given step by step guidance to run PuTTYgen: 90004
90069 Run PuTTYgen on Windows 90070
90002 To run PuTTYgen, Go to Windows -> Start Menu -> All Programs -> PuTTY -> PuTTYgen.You will see a window for the PuTTY Key Generator on your screen. 90004
PuTTY key generator screenshot
90002 Voila! Now you can generate public or private key pair using PuTTYgen. 90004
90007 Download PuTTYgen for Mac 90010
90002 Below is the detailed guide to download PuTTYgen on Mac operating system.Mac OS has a built-in command-line SSH client known as Terminal. To utilize it, go to Finder and then opt for Go -> utilities from the top menu. After that find the terminal which supports SSH connections to remote servers. 90004
90002 However, to run PuTTYgen for mac, the first one must have to install PuTTY. There are multiple ways to install PuTTY, which are Homebrew or MacPorts. Both alternatives will also install the command-line of adaptations of PuTTYgen. 90004
90069 Ported PuTTY for Mac 90070
90002 Mac has the port of PuTTY which can be installed in various ways described as below: 90004
90021
90022 90087 Installation using Homebrew: 90088 90002 First, install the ‘brew command line’
Once installed use the below-given command to install PuTTY: — 90004 90002 90092 sudo brew install putty 90093 90004 90023
90022
90087 Installation using MacPorts: 90088 90002 First of all, one must install MacPorts and then use the command-line to install PuTTY.Here is the command to install PuTTY via MacPorts 90004 90002 90092 sudo port install putty 90093
90004 90002 Additionally, a user can also add a shortcut to the desktop by writing the following command line 90004 90002 90092 -cp / opt / local / bin / putty ~ / Desktop / PuTTY 90093 90004 90023 90034 90002 However, there is an alternative way to install PuTTY on Mac OS. 90036 Cyberduck 90037 is a widely used Mac OS SSH Client.Once PuTTY installed on the Mac OS, a user can convert PuTTY derived private key format to OpenSSH. 90004
90002 To convert the private key to standard PEM format, type the following command — 90004
90002 90092 90008 puttygen 90009 privatekey 90008. 90009 ppk 90008 -O private- 90009 openssh 90008 -o 90009 privatekey 90008 .pem 90009 90093 90004
90002 You can also read the guide to convert .pem file to .ppk using puttygen.90004
90007 Download PuTTYgen for Ubuntu / Linux 90010
90002 To download PuTTYgen for Ubuntu (Linux) operating system, a user to first install PuTTY. However, in some Linux distributions, the SSH key generation tool — PuTTYgen needs to be installed independently from the PuTTY client. 90004
90002 For example, Debian Linux requires the below-given code to install PuTTYgen: 90004
90002 90092 sudo apt install putty-tools 90093 90004
90069 Generate Key Pair for Authentication in Linux 90070
90002 To create the key pair for authentication in Linux use the below command: — 90004
90002 90092 puttygen -t rsa -b 2048 -C «user @ host» -o keyfile.ppk 90093 90004
90069 Various Command Line Options of PuTTY in Linux 90070
90002 Below are few important command line options in the Linux operating system for PuTTY: 90004
90002 PuTTYgen [-t keytype [-b bits] [-q] | keyfile] 90003 [-C new-comment] [-P] 90003 [-O output-type | -p | -l | -L] 90003 [-o output-file] 90004
90002 90036 Options: 90037 90004
90021
90022 90036 Keyfile 90037 — It is the name of the existing key file to read at the time of changing the current key.90023
90022 — 90036 t keytype 90037 — The command specifies the type of key to creating. Its acceptable values are RSA and dsa.rsa1. 90023
90022 90036 -b bits 90037 — This command specifies a total number of bit in a particular key. Тисяча двадцять чотири is the perfect size for DSA key, while 2048 or 4096 are the perfect size for RSA keys. 90023
90022 — 90036 q 90037 — The command suppresses the message about progress at the time of key generation.90023
90022 90036 -C new-comment 90037 — The command will specify the comment to describe the key. It can be used for the new and / or existing key. Key operation is not affected by a comment. However, it is used to recognize the key owner, it’s not reliable completely as any value can be applied to it. 90023
90022 90036 -P 90037 — Using the command will update the passphrase of a key. Passphrase helps to encrypt the private key. As passphrase can not add or update on a command line, it prompts a new passphrase tool to alter it.90023
90022 90036 -old-passphrase-file 90037 — The old password of the key remains in this file. The command is used when the key is protected by a passphrase. 90023
90022 90036 -new-passphrase file 90037 — This command prompts the new passphrase of the key. It comes in the action either at the time of generating a new key or while applying -P command to change the passphrase. 90023
90022 90036 -O output-type 90037 — This command defines what to give in output.By default, the private key is the output. 90023
90034
90002 Thus, above are the prominent commands of PuTTYgen in Linux operating system. Besides that, there are many other commands available to perform various tasks from the command prompt in Linux at flank speed. 90004
90069 Types of Keys Supported on PuTTYgen 90070
90002 It is important to know the types of key PuTTYgen supports prior to using it.Below are the key types that it currently supports for SSH-2 and SSH-1 protocol: — 90004
90210
90022 SSH-1 protocol: — For SSH-1 only supports one key i.e. Rivest-Shamir-Adleman (RSA) 90023
90022 SSH-2 protocol: — SSH-2 supports multiple key types that include — Digital Signature Algorithm (DSA), Elliptic Curve Digital Signature Algorithm (ECDSA) and Ed25519. 90023
90215
90002 The above description is a detailed brief on downloading and running PuTTYgen on all major operating systems.For further details please check the Download PuTTY page. 90004
.